How Manage Instagram Stories Using GEM Software Social Planner
Abstract
Instagram Stories are a powerful tool for engagement. But managing them manually every day can be draining. That’s where GEM Software’s Social Planner steps in. It helps you schedule, manage, and automate your Instagram Stories with ease. In this guide, we’ll show you step-by-step how to use GEM Software to boost your consistency, save time, and stay ahead of your content plan.
Introduction
Instagram Stories are quick, fun, and highly visible. They keep your brand top of mind.
But creating them daily can interrupt your workflow. Forgetting to post? Even worse.
GEM Software’s Social Planner helps you plan and automate Stories. This means more consistency and less stress. It’s perfect for small business owners, creators, and teams alike.
Let’s explore how to use this tool like a pro.
Key Takeaways
GEM Software’s Social Planner lets you schedule and manage Instagram Stories with ease.
Save time by batching and auto-posting content.
Add text, tags and CTAs to increase engagement.
Preview your story and monitor results all in one place.
GEM is more than a scheduler it’s a full business suite.
What Is the GEM Software Social Planner?
The GEM Social Planner is an all-in-one scheduling tool.
You can:
Plan Instagram Stories in advance
Upload media directly from your desktop
Add captions, stickers, and tags
Schedule Stories to post automatically
Track engagement and performance
All from one dashboard.
No more app-hopping or missing prime posting times.
Benefits of Using GEM for Instagram Stories
Here’s why you’ll love it:
✅ Save Time
Create a week’s worth of Stories in one sitting.
✅ Stay Consistent
Post daily without being glued to your phone.
✅ Stay Organized
Batch content. Track what’s scheduled, posted, or needs editing.
✅ Maximize Reach
Post at optimal times when your audience is online.
✅ Collaborate Easily
Work with your team or VA. Assign tasks or approve drafts.
Step 1: Access the Social Planner in GEM
Log into your GEM Software dashboard.
From the left menu, click “Marketing” → then “Social Planner.”
You’ll land on a calendar view. This shows scheduled content across platforms. Instagram is one of them.

Step 2: Connect Your Instagram Account
Before scheduling, connect your Instagram account.
Click “Settings” in the Social Planner.
Select “Instagram” and log into your account.
Make sure it's a Business or Creator profile linked to Facebook.
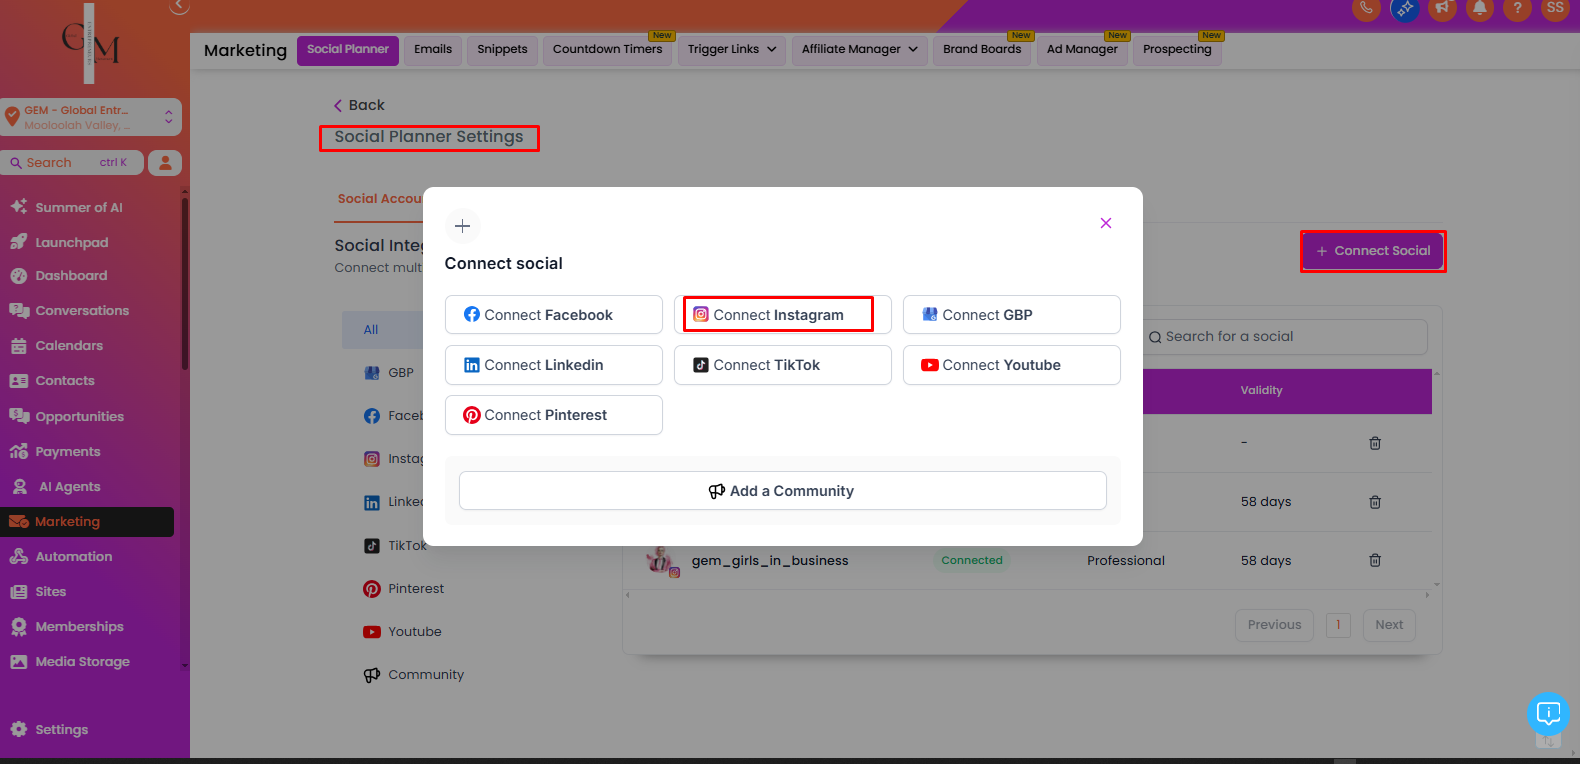
Now GEM can post your Stories automatically.
Step 3: Create a New Story Post
Click “+ New Post” or drag your cursor over a date on the calendar.
Select Instagram Story from the platform options.
You’ll now see the Story editor window.
Step 4: Upload Your Story Content
Click “Upload Media” to add photos or short videos.
Supported formats include:
JPEG or PNG images
MP4 videos under 60 seconds
You can upload directly or choose from your media library.
Want to add branded templates? You can upload Canva-designed assets too.
Step 5: Add Captions, Hashtags and Stickers
Once uploaded, you can:
Add text overlays or emojis
Include @mentions or #hashtags
Use branded stickers or location tags
GEM supports Instagram-friendly editing tools, so your content looks great.
Keep your text concise. Make sure it fits visually.
Step 6: Choose the Best Time to Post
Click “Schedule” and pick the best time for your audience.
Tip: Post when engagement is high (often 10 AM - 1 PM or 7 PM - 9 PM).
GEM can suggest optimal times based on past performance.
You can also set it to auto-post or save as draft if you want to review later.
Step 7: Preview and Confirm
Always preview your Story before finalizing.
Make sure:
Text fits within screen edges
Nothing is cut off
The design is mobile-friendly
Click “Schedule Post” when you're ready.
GEM adds it to the calendar and takes care of the posting for you.
Step 8: Monitor and Analyze Story Performance
After publishing, you can monitor performance from the same dashboard.
GEM shows metrics like:
Views
Replies
Taps forward/back
Exits
Use this data to improve your future content.
For example, if people exit early, shorten your story or improve the hook.
Tips to Maximize Story Engagement with GEM
📌 Use Polls or Questions
Interactive stickers boost engagement.
📌 Add a Call-to-Action
Tell viewers what to do next “Swipe up” “DM us” or “Click the link in bio.”
📌 Stay Branded
Use consistent fonts, colors, and style. Upload branded templates for fast reuse.
📌 Batch Your Content
Create Stories for the whole week in one go. GEM keeps them organized.
📌 Repurpose Reels or Posts
Turn existing content into short Stories to reach more viewers.
Troubleshooting Common Issues
🚫 Story Not Posting?
Check that your Instagram is set to Business.
Make sure it's connected to a Facebook Page.
Refresh the connection in GEM.
🕐 Wrong Post Time?
Double-check your time zone settings in GEM.
Why Use GEM Over Other Schedulers?
While tools like Later or Planoly exist, GEM offers full business integration.
With GEM, you can:
Sync automations
Manage emails and SMS
Run funnels and campaigns
Book appointments
And now, manage social media
No more switching between 5 platforms. It’s all-in-one.
Conclusion
Instagram Stories are too valuable to leave to chance. With GEM Software, you can show up every day, even when you’re busy.
Plan smart. Post consistently. Grow effortlessly.
Now that you know how to schedule and manage Instagram Stories using GEM Software, it’s time to turn that content strategy into action.
Let GEM do the heavy lifting so you can focus on what you love.
Let me know if you’d like carousel post designs or video tutorials based on this guide!
